Last time, I finished making car decals, and now, in this blog, I am writing about coasters. With this tutorial, I will explain everything about how to make Cricut coasters yourself. As a crafting enthusiast, I am often ready to try something new. Recently, when I was looking for an idea, I thought about creating coasters. Also, I came to know that Cricut’s coaster blank sublimates are really nice. Hence, my curiosity to try this coaster inspired me to write this blog.
So, let’s delve into this blog to learn the procedure in simple steps. Throughout the process, I will explain how I made it all. Before you learn how to make coasters with Cricut, you need to check out the list of supplies required for creating these coasters.
Essential Supplies for Custom Coaster With Cricut

All types of projects will require you to have some kind of essential items that are used to create a project. Below, I am listing some supplies for Cricut infusible ink coasters; be sure to have all of them or any other alternative options:
- Cricut Explore or Maker
- Infusible Ink Transfer Sheet
- Infusible Ink Ceramic Coasters
- EasyPress 2
- EasyPress Mat
- White Cardstock
- Butcher Paper
- Green StandardGrip Mat
How to Make Cricut Coasters for the First Time?
Now that you have all the essential supplies that are helpful for creating coasters, I will teach you how to make coasters with Cricut. So, follow the steps with me and create your own coasters. However, you can choose any other design from Design Space because the process is going to be the same for all designs.
Step 1: Browse and Create a Design
If you don’t have much time to create your own design, then Design Space has a huge collection of coaster designs for you. All you need to do is browse them as per your choice.
Here’s how to browse the designs:
- Go to the Design Space and hit the Canvas tab given in the top left corner.
- Next, you have to search for coaster designs on the search bar.
- Then, choose the design that you like.
- Finally, you need to hit the Make It button given in the lower right corner.
- After that, you will be entered into the Canvas.
- Here, you can edit and resize the design as per your requirements. Each Cricut coaster blank measures about 3.5” x 3.5”.
- After selecting a design, I duplicated them for multiple coasters, and I chose to keep the same color so that I could cut on the same infusible ink sheet.

Step 2: Cut the Design With Your Cricut Machine
Now you are done with your design, you can proceed by clicking on Make It, located in the upper right corner. Meanwhile, you need to Mirror the image.
Note: You should mirror only when you have text or something that can be inverted after transferring on the blank.
Since I am using a pattern, I don’t need to mirror my design. On the Make screen, you have to choose your material: Infusible Ink Transfer Sheet. Also, you need to insert the Fine Point Blade.
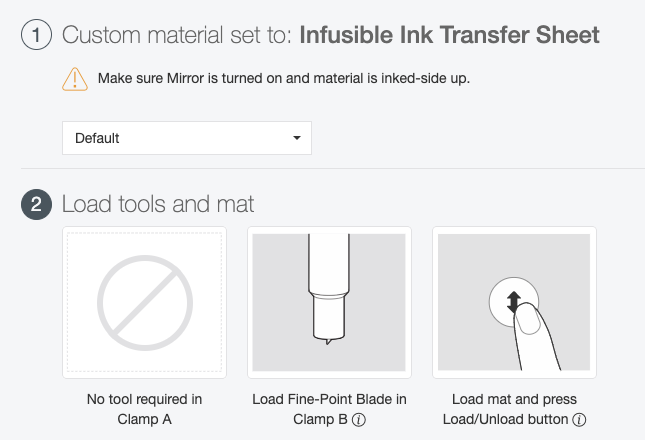
Afterward, I will suggest you place the infusible ink transfer sheet on the green cutting mat. Then, load the mat and start cutting your design.

Step 3: Weed Out Your Design

Now you have cut your image, you have to weed it. Although you can weed it using the weeding tool, bend the paper to remove the negative space from the backing plastic. I always do this, but if you are a beginner and are not sure how to do this, then you need to use the wedding tool.
Step 4: Apply Design on Blank
Now, it’s time to apply the design on the Cricut coaster. For this, you have to lay out your coasters for infusible ink. Here’s the proper order you need to follow from bottom to top:
- EasyPress Mat
- White cardstock (protection for your mat)
- Weeded image (keep the colored side UP)
- Coaster (shiny side DOWN)
- Butcher paper
- EasyPress 2
After this, you should do some heat time and temperature settings. This step is essential for transferring the infusible ink design onto your blank coasters. However, the Heat Settings Guide suggests the time and temperature for invisible ink is 400°, and that too for ceramic coasters.
Once the temperature setting is done, you have to place it carefully on the top of the stack you prepared above. You need to place the Heat Press machine for 240 seconds.

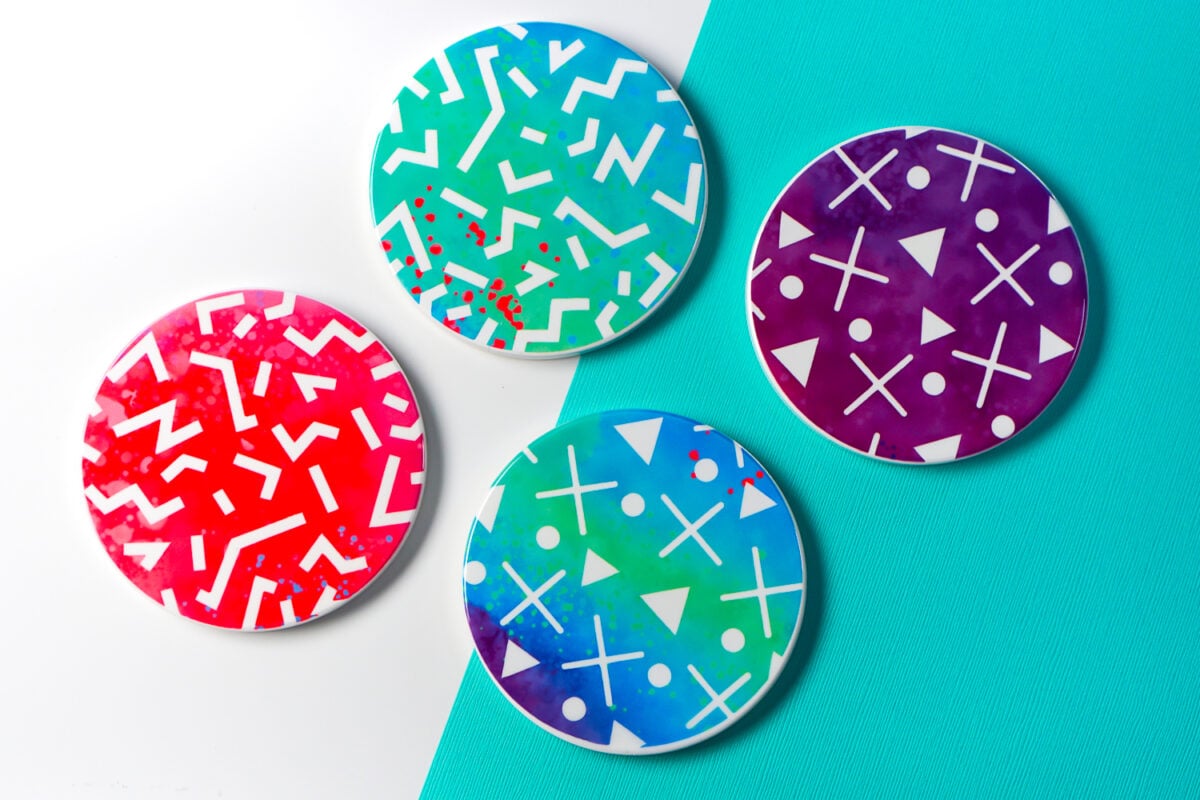
Make sure you don’t need to apply any pressure; you just need to keep it on the top. Later, when the countdown reaches zero, your coasters will be ready to use. Here’s the final result! Till now, the guide has explained to you how to make Cricut coasters.
Question 1: Should I use Cricut permanent vinyl on coasters?
Answer: Definitely yes! In fact, Cricut vinyl will be the most suitable material to make coasters, as it gives professional and eye-catching results. The permanent vinyl comes with a water-resistant feature so that it can last longer than you think. Due to this properly, permanent vinyl is the best material for outdoor use. To apply it on your desired blank, you need to cut the vinyl in an apt size that will fit your blank properly. So, feel free to use the vinyl for your coaster or any other projects.
Question 2: Can I make wood coasters using my Cricut machine?
Answer: Yes, Cricut can easily cut wood materials into desirable intricate shapes or designs. To cut the wood, you will need a knife that you can install into your Cricut Maker machine. Since I love and trust the Maker machine, I often use it for my projects. Be it starfish shape or any other, Cricut has got you covered, and it will definitely make you learn how to make Cricut coasters.
Question 3: What are the materials for creating Cricut coasters?
Answer: Cricut manufactures its own coasters made up of ceramic. In contrast, they come in two shapes: Circle and Square, which measure 3.6” in dia and 3.75” square. These coasters also contain cork inside them, which is considered super absorbent. Besides, if you want something elegant, then you can go with wood, marble, acrylic, and leather options.
Final Words
So far, you might have understood how to make Cricut coasters. This tutorial is beginner-friendly, so anyone can easily understand this instruction. The blog starts with the supplies that you will need to prepare your coasters, so make sure you have the right tools for your projects. In this project, I have also used EasyPress 2. Although you can use regular household iron, the result may not be as professional as you get with the Cricut Heat Press.
Source: https://xn--crcutmachinesetup-evb.com/how-to-make-cricut-coasters-a-step-by-step-guide/