Are you fascinated by custom mugs and their beautiful designs? Are you thinking about creating or customizing designs your own way? Wander not! You have just come to the right place. With this Cricut Mug Press guide, your dream will come true.
This blog will help you decide whether this press machine is worthwhile to buy or not. Without further ado, let’s get started right away to make your purchase decision easier.
We will also look at the accessories and other materials, along with what comes with the box. This write-up will also explore the activation part of the machine.
What Is a Cricut Mug Press?
This amazing product is a heating press custom sublimation mug designer. It comes with a compatible ceramic mug along with infusible ink transfer sheets. With this machine, you can use your cutting tools as well, like Cricut Explore Air 2, Maker, or Joy, to cut designs and apply them to your mug. This machine has no manual temperature or pressure settings, so it gives users the flexibility to worry less about customization. Not only is it compatible with infusible inks, but you can also create unique and one-of-a-kind sublimator art each time. Optimum for infusible ink products: this machine can also serve as a complementary tool to the cutting machine or EasyPress, which can help you grow your business.
The Cricut Mug Press allows you to create custom dishwasher—and microwave-safe mugs without waiting weeks for things to dry or worrying about the temperature or pressure settings. You can make a variety of mugs, mostly as gifts. It can be so confusing to set up that people donate unused mug presses to gift stores. This blog will help you learn how to set up your machine so you don’t end up donating it.
Major Features of Cricut Mug Press
You will find the main power button of the mug press right at the top, facing yourself. It will be just below 3-point blinking lights. When the power button is green, it means the press is ready for use. The 4 lights above the power button indicate the transfer’s progress level. You will also find a level at the right part of the machine; make sure that it is always when putting a mug into the machine. Pressing the lever will fix the cup in a spatial position in order for the transfer to begin. It will also engage the machine’s heat element. A beep with the full-scale LED lights (the four lights lit up) means that your transfer is complete. To remove the mug from the fixed position, pull the lever up to unlock it.
What Comes in the Cricut Mug Press Box?
The original machine comes with a designated power cord and a USB cable (to connect the machine to your computer). There is also a welcome envelope with a starter guide and a piece of warranty information, which can be quite helpful for beginners. Also, ensure that your warranty info is kept safe, as it will help you in the near future if your machine breaks down and you meet the necessary requirements.

Though sold separately, this machine also requires infusible ink transfer sheets and pens. To have a smooth experience, one also needs markers and compatible mug blanks.
Remember that the machine won’t work until you activate it. So, activating it is crucial. Also, make sure that you are using a computer and not a mobile device. Once you finish this, surf to cricut.com/setup, choose your machine’s name, and set it up as soon as possible. You must place your machine in a safe place with good airflow. A window would be a perfect example. Also, ensure that the area you put your machine in is stable, flat, and heat resistant. Along with that, it must have some space, too.
How to Activate Cricut Mug Press?
You must first know ‘how to activate the Cricut heat Press machine‘ to use it. Activation is an important part of understanding the machine. Follow the below steps for a hassle-free activation for this product:
Step 1: On a Mac or Windows computer, open any browser of your choice and surf to design.cricut.com/setup.
Step 2: If you have pre-installed Cricut Design Space software, go ahead and launch it. If not, tick the checkbox for terms and conditions and then download the app.

Step 3: Once downloaded, go to the Downloads folder, select the file, and run it.
Step 4: To continue the activation process, you will need to Sign In to your account with your login credentials. If you do not have an account, you will need to create one.

Step 5: Once the account is created, open your Cricut Design Space app and click on the Setup option.
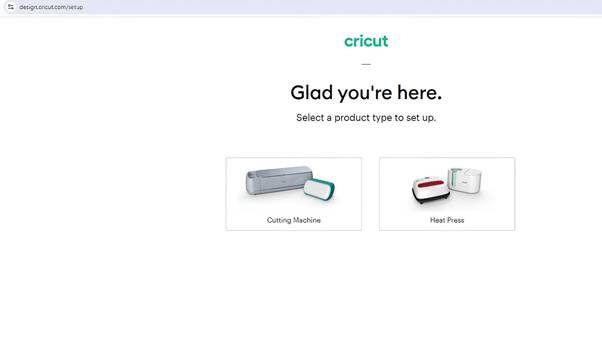
Step 6: Now, select the machine from the list of available devices and tap on the Cricut Mug Press.
Step 7: After that, keep following the on-screen prompts to connect your machine.
Once you check your firmware settings, your activation will be nearly complete. Then, you can proceed further and choose to get started with your first design.
Note: Your press machine will be registered as soon as you are done activating it.
Conclusion
I hope that by reading this blog, you will learn everything you need to know about the Cricut Mug Press. Following the correct sequence will ensure a smooth activating experience. Once you have gone through this post, customizing your mugs should be easy. Enjoy your creative vision with customized mugs using this wonderful, easy-to-use tool. Happy hunting for the best mug aesthetics!
Frequently Asked Questions (FAQs)
How to download Cricut Design Space on a PC?
To setup the Cricut machine, you will need to download and install the Design Space on your PC. Here’s how to download it:
- Open the browser and navigate to Cricut.com/setup.
- After that, you will see a checkbox. Click on it to enable the Download button.
- When the download is done, you have to go to your Downloads folder.
- If asked, click on the Yes button to trust the application source.
- In the last step, installation will begin.
Why am I facing an issue when downloading Cricut Design Space App?
The procedure to download the software is easy, but you may face some issues. Here are some common reasons for that:
● Your operating system does not meet the compatibility criteria.
● The network on your PC is not stable or weak.
● The settings on your device are stopping the app from downloading.
● Your device firewall is interrupting the download or installation process.
● Maybe you are not following the right download procedure, etc.
How to Setup Cricut Explore Air 2 on Mac?
Below are the fundamental steps you need to follow to setup the machine on a Mac.
- At the start, switch on your Cricut machine by connecting it to a power source.
- Also, place the Mac System and machine in the close connection range (10-15 feet.)
- Then, both systems can be connected using a USB cable or Bluetooth connectivity.
- From the official brand website, download and install the Cricut design app.
- Once the download process is complete, open the app and sign into your account.
- Afterward, go through the process of setting up the machine and starting to use it.
Why Is My Cricut Maker 3 Not Connecting to Bluetooth?
If you found your machine not connecting to your PC via Bluetooth, then you need to check the following points:
- Check the power connection to see whether your device is properly turned on.
- Ensure the distance between your machine and PC is not more than 15 feet.
- Check for Bluetooth connection and confirm whether you have turned it on.
How to Setup Cricut Explore 3 to Computer?
Setting up a Cricut machine is a breeze. However, the following steps can help you with the setup:
Finally, your Cricut Machine Setup is done.
You need to plug the Cricut machine into the wall outlet.
Then, connect the Cricut Explore 3 machine via Bluetooth or USB cable.
After that, you have to download the Cricut software.
Next, create a Cricut ID using your Cricut Design Space.
Source: Cricut Mug Press Setup